![[Home]](/img/mcx_wiki_banner.png)
MCX'18 Workshop Preparation Instructions - Method A
Method A: Running everything from your laptop
- 1. Preparation of your Laptop
- 2. Step 1. Verify your CPU/GPU support
- 3. Step 2. Install MATLAB
- 4. Step 3. Download the MCXStudio software package
- 4.1. Notes for Mac Users
- 4.2. Notes for Windows Users
- 6. Step 5. Run a trial simulation
- 7. Step 6. Test MATLAB for visualization
- 8. Step 7. Setting up MATLAB search path for MCXLAB/MMCLAB training
- 9. Final suggestions
The purpose of this document is to help you test/configure your own laptop, and set up a working environment for our modeling tools.
If you have an Intel CPU with integrated Intel graphics (HD Graphics, Iris etc), our goal is to find out if you can run MCX-CL and MMC on your laptop; if your laptop contains an NVIDIA GPU, we will also test to see if you can run MCX (and/or MCX-CL) smoothly from your laptop.
If we can not get these tools to work, you will have to move on to the instructions for Method B.
Please checkout hashtag #MCXOSA18 on Twitter for discussions and quick support on the preparation.
1. Preparation of your Laptop
We assume you use one of the 3 supported configurations:
- a 64bit Windows
- a 64bit Linux computer, or
- a 64bit Mac with Intel CPU (you may have to manually start MATLAB for plotting, see Step 6)
We don't support 32bit operating system any more (such as 32bit Windows XP). If your laptop runs on a 32bit OS, you will have to either upgrade it to a 64bit OS, or bring another laptop.
For Windows and Linux laptops, we strongly recommend you to install the Intel CPU OpenCL run-time from the below link, although many laptop may run MCX-CL simulations without needing this run-time library.
https://software.intel.com/en-us/articles/opencl-drivers#latest_CPU_runtime
The OpenCL support for Intel CPU and integrated GPU are already built-in in Mac OSX.
2. Step 1. Verify your CPU/GPU support
We will use MCX-CL as our primary tool for demo and training (the operations to use MCX-CL and MCX are almost identical).
MCX-CL supports a wide-range of processors, including Intel/AMD CPUs and GPUs from NVIDIA/AMD/Intel.
2.1. Verify GPU/CPU support
To verify if you have installed the OpenCL or CUDA support, you may
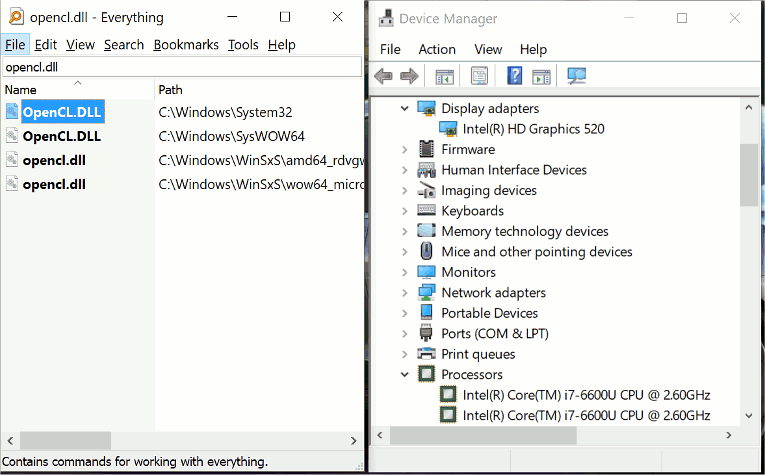
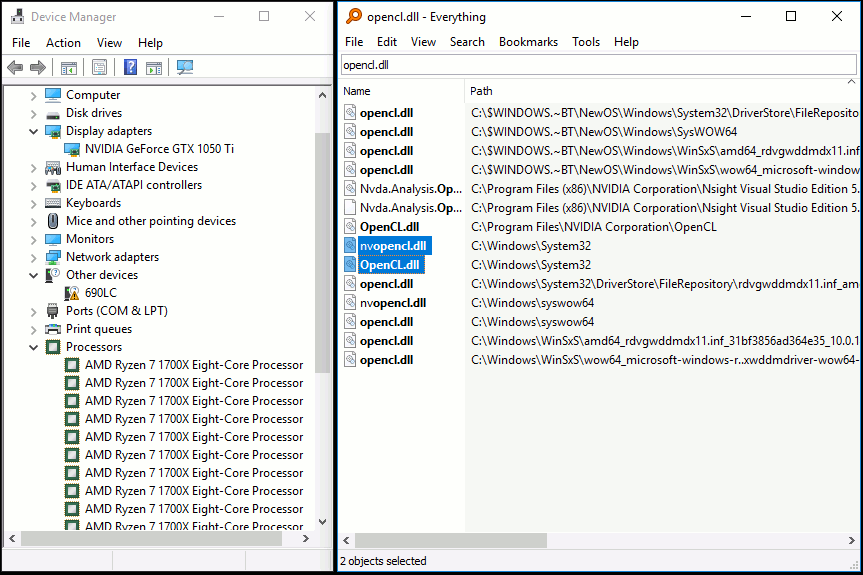
- if you have a windows machine, download and install the Everything Search tool (a small and fast file name search utility), and type "opencl.dll" in the search bar
- Expected result: you must see OpenCL.dll (or nvopencl.dll if you have an NVIDIA GPU) installed in the Windows\System32 directory.
- if you have an Mac, open a terminal, and type ls /System/Library/Frameworks/OpenCL.framework/Versions/A/OpenCL
- Expected result: you should not see an error.
- if you have a Linux laptop, open a terminal, and type locate libOpenCL.so,
- Expected result: you should see one or multiple libOpenCL files
Example screenshot from a laptop with integrated GPU
Example screenshot from a computer with dedicated NVIDIA GPU
If the OpenCL.dll file is not found on your system, please read the below sections. Otherwise, please go to Step 2.
2.2. Laptops without discrete GPUs
In most cases, your laptop runs on an Intel CPU with integrated graphics. In this case, please make sure you have installed the latest Intel graphics drivers. If you are certain that you have installed the graphics drivers, or your graphics works smoothly, please skip this step.
If you want to double check, for Windows machine, you can download the "Intel Driver&Support Assistant" to check if you have installed the graphics drivers
https://downloadcenter.intel.com/download/24345/Intel-Driver-Support-Assistant
for a Mac, you need to use your App store to update the driver, see the below link for details
https://www.intel.com/content/www/us/en/support/articles/000022440/graphics-drivers.html
for a Linux (for example Ubuntu) laptop, the intel CPU OpenCL run-time can be downloaded from
https://software.intel.com/en-us/articles/opencl-drivers#latest_CPU_runtime
if you want to use both Intel CPU and GPU on Linux, you need to install the OpenCL™ 2.0 GPU/CPU driver package for Linux* (this involves compiling a new kernel)
https://software.intel.com/en-us/articles/opencl-drivers#latest_linux_driver
2.3. Laptops with discrete GPUs
if you want to bring a beefy laptop with discrete GPU to the workshop, you need to make sure your discrete GPU is configured with the appropriate GPU driver installed. Again, if you have been using your laptop regularly and the graphics has been smooth, likely your graphics driver has already been installed.
If your GPU driver was not installed, and would like to install, or upgrade from an older version, for an NVIDIA GPU, you may browse this link to install the matching driver
http://www.nvidia.com/Download/index.aspx
if your GPU is an AMD GPU, please use the below link
https://support.amd.com/en-us/download
It is also possible to simultaneously access Intel CPU along with your discrete GPU. In this case, you need to download the latest Intel OpenCL Runtime for CPU only if you haven't installed it already.
https://software.intel.com/en-us/articles/opencl-drivers#latest_CPU_runtime
Note: if you have an NVIDIA GPU, there is no need to install CUDA in order for you to run MCX/MCXLAB.
3. Step 2. Install MATLAB
MATLAB is needed for the majority of the training. You must install a working copy of MATLAB before the event. If you do not have a license, you may download a trial version of MATLAB. The trial version has a 30-day limit.
If you use a Mac or Linux laptop, you need to create a link so that your system can find MATLAB. To do this you start a terminal, and type
sudo ln -s /path/to/matlab /usr/local/bin
please replace /path/to/matlab to the actual matlab command full path (for Mac, this is typically /Application/MATLAB_R20???.app/bin/matlab, for Linux, it is typically /usr/local/MATLAB/R20???/bin/matlab, ??? is the year and release, such as 18a, 17b etc). You need to type your password to create this link.
To verify your computer has MATLAB installed, please start a terminal on a Mac or Linux, or type "cmd" and enter in Windows start menu, in the terminal, type "matlab" and enter, you should see MATLAB starts.
4. Step 3. Download the MCXStudio software package
Our developed MCX/MMC/MCXCL tools are packaged in a single zip file, available for you to download at
Please click on the folder matching your operating system (for example, if you run a 64bit Windows, you need to navigate into win64 folder), and download the file named "MCXStudio-MCX18-nightlybuild.zip".
Open this file, and unzip it to a working folder (for Windows, for example, the Documents or Downloads folder). The package needs about 100 MB disk space.
Once unzipped, you should be able to see a folder named "MCXStudio", with a few executables and 3 subfolders underneath. See the folder structure below:
MCXStudio/
├── MATLAB/
│   ├── mcxlab/
│   ├── mcxlabcl/
│   └── mmclab/
├── MCXSuite/
│   ├── mcx/
│   ├── mcxcl/
│   └── mmc/
├── mcxstudio
├── mcx
├── mmc
├── mcxcl
└── Output/
Please make sure that your downloaded MCXStudio must match your operating system.
4.1. Notes for Mac Users
For Mac users: Please unzip the package under your home directory directly (Shift+Command+H).
4.2. Notes for Windows Users
When you start MCXStudio, you may see a dialog to ask you to modify the TdrDelay key in the registry so that mcx can run more than 5 seconds. If you select Yes, some of you may get an error saying you do not have permission.To solve this problem, you need to quit MCXStudio, and then right-click on the mcxstudio.exe, and select "Run as Administrator". Then, you should be able to apply the registry change successfully. You must reboot your computer for this change to be effective!
5. Step 4. Start MCXStudio and query GPU information
Now, navigate to the MCXStudio folder (i.e. the top folder of the extracted software structure). On Windows, right-click on the executable named "mcxstudio.exe" and select "Run as Administrator" for the first time only; on the Linux, double click on the mcxstudio executable; on the Mac, open a terminal and type
 cd ~/MCXStudio
 open mcxstudio.app
You should see the below interface. Please proceed using the orders of the labeled red numbers in the screenshot.
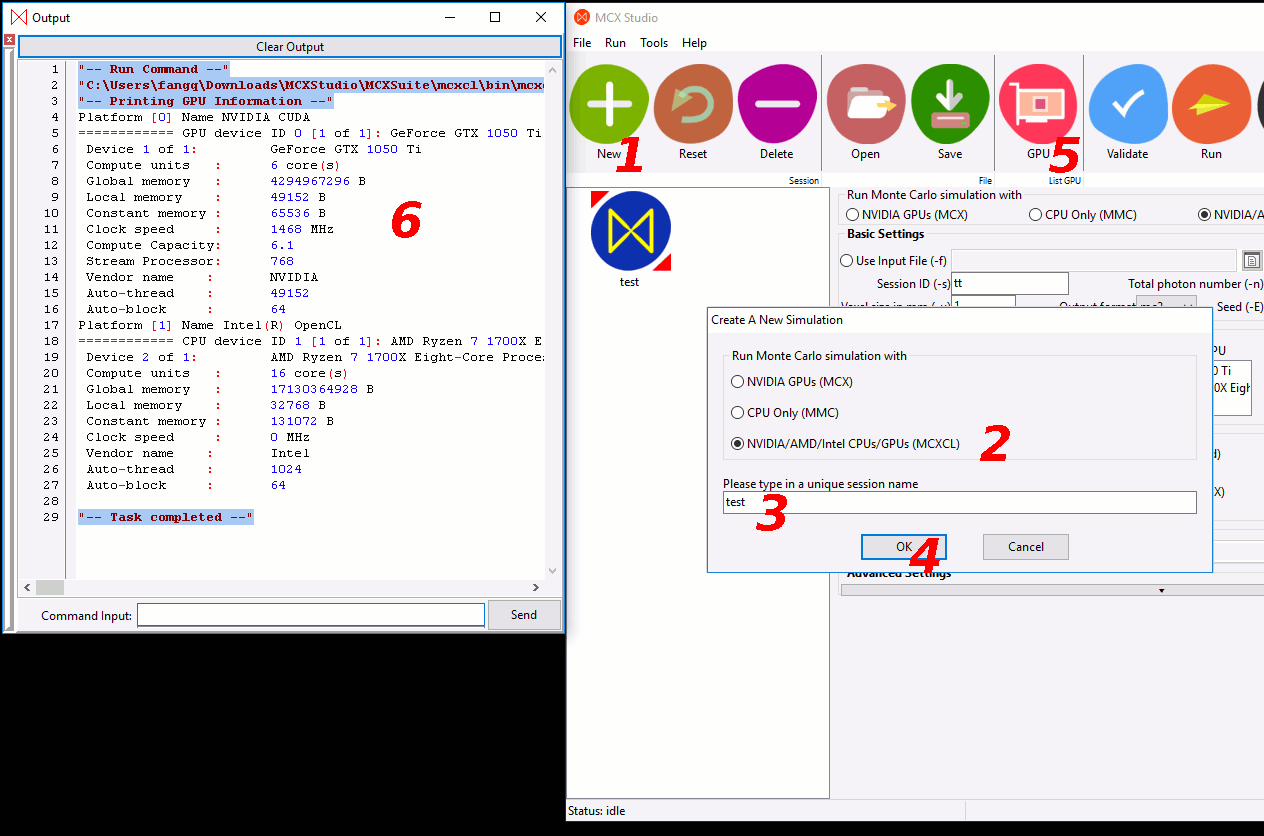
First, click on the "New" button to the top-left (green plus icon), select the 3rd option "NVIDIA/AMD/Intel CPUs/GPUs (MCX-CL)", and type a session name "preptest" in the field below. Then click OK. You should see a blue/yellow "preptest" icon added to the left panel.
Now, click on the "GPU" button on the toolbar (6th button from the left side), an Output window will popup, and wait for a few seconds, you should see an output like
"-- Run Command --"
"/drives/taote1/users/fangq/Download/MCXStudio/MCXSuite/mcxcl/bin/mcxcl" -L
"-- Printing GPU Information --"
Platform [0] Name NVIDIA CUDA
============ GPU device ID 0 [1 of 2]: Graphics Device  ============
 Device 1 of 2:		Graphics Device
 Compute units   :	80 core(s)
 Global memory   :	12644188160 B
 Local memory    :	49152 B
 Constant memory :	65536 B
 Clock speed     :	1455 MHz
 Compute Capacity:	7.0
 Stream Processor:	10240
 Vendor name    :	NVIDIA
 Auto-thread    :	655360
...
Platform [1] Name Intel(R) OpenCL
============ CPU device ID 2 [1 of 1]: Intel(R) Core(TM) i7-7700K CPU @ 4.20GHz  ============
 Device 3 of 1:		Intel(R) Core(TM) i7-7700K CPU @ 4.20GHz
 Compute units   :	8 core(s)
 Global memory   :	33404575744 B
 Local memory    :	32768 B
 Constant memory :	131072 B
 Clock speed     :	4200 MHz
 Vendor name    :	Intel
 Auto-thread    :	512
 Auto-block     :	64

"-- Task completed --"
If you do not see any output, or it returns no GPU found, that means your OpenCL support was not installed properly. Please go back to Steps 1-2 and reinstall the drivers.
If you have Intel CPU with Integrated GPU, you should be able to see a section with "Platform [?] Name Intel(R) OpenCL" in the above output. You may see only the CPU is listed, or both the CPU and the integrated GPU.
6. Step 5. Run a trial simulation
If your above GPU query was successful, you should now see in the middle panel of the MCXStudio window, under the Section entitled "GPU Settings", in a check-box list under "Run MCX on", you should now see the available devices on your laptop.
To avoid running lengthy simulations, please change the "Total photon number (-n)" field under the "Basic Settings" from 1e6 to 1e5.
Now, you can then run a trial simulation, by first clicking on the "Validate" button (blue check-mark icon), and then click on "Run" (the button to the right of validate). This will launch an MCXCL simulation. The output window will show again, and you can see the messages printed from the simulation, similar to the output below
"-- Command: --"
mcxcl --session "preptest"  --input "/drives/taote1/users/fangq/Download/MCXStudio/Output/mcxclsessions/preptest/preptest.json" --root "/drives/taote1/users/fangq/Download/MCXStudio/Output/mcxclsessions/preptest" --outputformat mc2 --gpu 10 --autopilot 1 --photon 10000000 --normalize 1 --save2pt 1 --reflect 1 --savedet 1 --unitinmm 1.00 --saveseed 0 --seed "1648335518" --compileropt "-D USE_ATOMIC" --array 0 --dumpmask 0 --repeat 1  --maxdetphoton 10000000
"-- Executing Simulation --"
==============================================================================
=                       Monte Carlo eXtreme (MCX) -- OpenCL                  =
=          Copyright (c) 2010-2018 Qianqian Fang <q.fang at neu.edu>         =
=                             http://mcx.space/                              =
=                                                                            =
= Computational Optics&Translational Imaging (COTI) Lab - http://fanglab.org =
=            Department of Bioengineering, Northeastern University           =
==============================================================================
=    The MCX Project is funded by the NIH/NIGMS under grant R01-GM114365     =
==============================================================================
$Rev::6e839e $ Last $Date::2017-07-20 12:46:23 -04$ by $Author::Qianqian Fang$
==============================================================================
- variant name: [Detective MCXCL] compiled with OpenCL version [1]
- compiled with: [RNG] Logistic-Lattice [Seed Length] 5
initializing streams ...	init complete : 0 ms

Building kernel with option: -cl-mad-enable -DMCX_USE_NATIVE -DMCX_SIMPLIFY_BRANCH -DMCX_VECTOR_INDEX -DMCX_SRC_PENCIL  -D USE_ATOMIC -DUSE_ATOMIC -D MCX_SAVE_DETECTORS -D MCX_DO_REFLECTION
build program complete : 23 ms
- [device 0(1): Graphics Device] threadph=15 oddphotons=169600 np=10000000.0 nthread=655360 nblock=64 repetition=1
set kernel arguments complete : 23 ms
lauching mcx_main_loop for time window [0.0ns 5.0ns] ...
simulation run# 1 ...

kernel complete:  	796 ms
retrieving flux ...
detected 0 photons, total: 0	transfer complete:        818 ms
normalizing raw data ...	normalization factor alpha=20.000000
saving data to file ... 216000 1	saving data complete : 821 ms

simulated 10000000 photons (10000000) with 1 devices (repeat x1)
MCX simulation speed: 12953.37 photon/ms
total simulated energy: 10000000.00	absorbed: 27.22654%
(loss due to initial specular reflection is excluded in the total)
If this simulation is completed successfully, you should be able to see the "Simulation speed" and total simulated energy reported at the end. Please verify your "absorbed" percentage value printed at the end (in bold above), and make sure it is ~27%. We found that some Intel OpenCL library versions produced incorrect results.
If your laptop shows an error for the Intel GPU, please choose another device from the "GPU Settings" section, and run the simulation again.
If your GPU/CPU gives the below error (found on HD4400 GPU and 4th gen Intel CPUs)
  error: OpenCL extension 'cl_khr_fp64' is unsupported
  MCXCL ERROR(11):Error: Failed to build program executable! in unit mcx_host.cpp:510
You may add
-J "-DUSE_LL5_RAND"
in the MCXStudio GUI\Advanced Settings\Additional Parameters field. This should allow it to run, but please verify the absorption fraction is ~27%. For 4th generation Intel CPU, we found that install the Intel CPU OpenCL run-time can produce correct simulations. Please download it from here
https://software.intel.com/en-us/articles/opencl-drivers#latest_CPU_runtime
7. Step 6. Test MATLAB for visualization
Once this above simulation is completed, you can click on the "Plot" button on the toolbar, and from the drop-down menu, select "Plot fluence (mc2)". This will open a MATLAB window, and show you an iterative figure so you can visualize the image slices.
If MATLAB can not be started, you may not install MATLAB properly, or haven't added MATLAB executable to your PATH environment variable.
Update:03/30/18:
- We are aware that MATLAB can not be started from MCXStudio on the Mac. However, it will print a few lines of MATLAB commands in the "Output" window. As a workaround, you can start a separate MATLAB session, copy and paste the printed MATLAB commands, and run those directly in MATLAB (you need to complete Step 7 to run these commands).
- If MATLAB fails to run the command by complaining strings with Extended Latin characters, this is a result of your special keyboard setting. Please change it to an ASCII compatible keyboard layout and the command should be processed correctly.
8. Step 7. Setting up MATLAB search path for MCXLAB/MMCLAB training
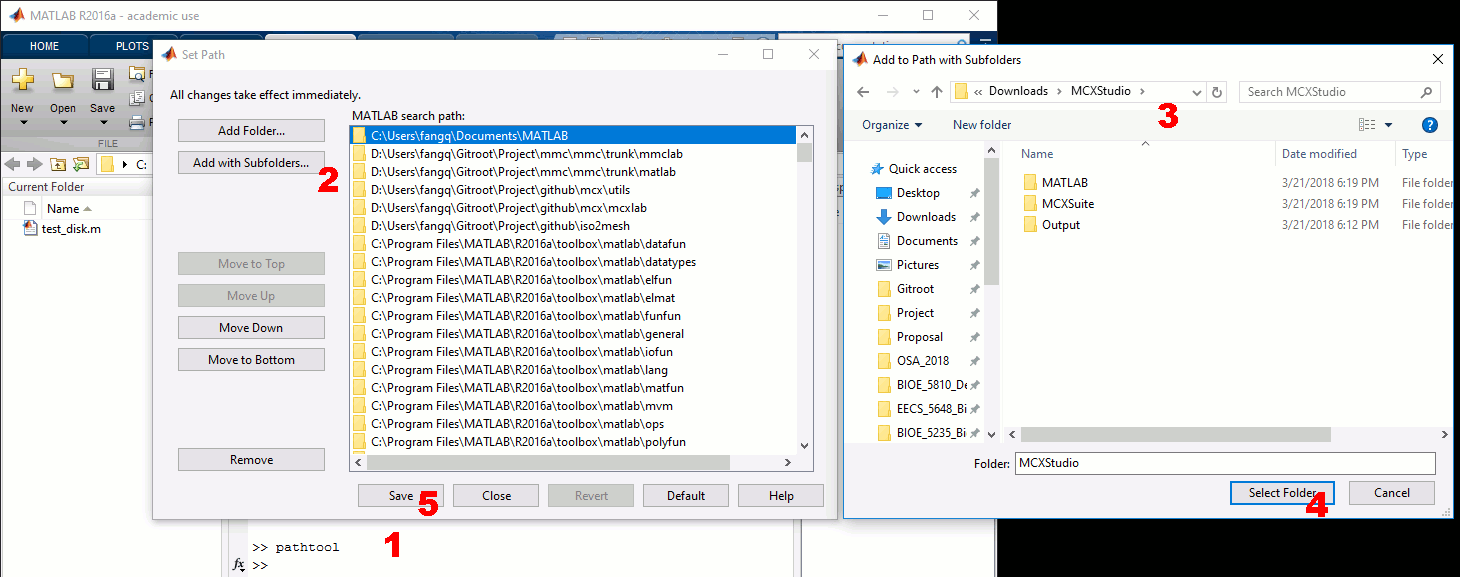
The next step is to set up the search paths for MCXLAB/MMCLAB. You need to start MATLAB, and in the Command window, please type
pathtool
this will popup a window. Click on the "Add with Subfolders ..." button (the 2nd from the top), then browse the MCXStudio folder, then select OK. Now you should see all needed MCX/MMC paths are added to MATLAB. Before you quick this window, click on the "Save" button.
To verify if your MCXLAB/MMCLAB/MCXLABCL has been installed properly, please type
 which mcxlab
 which mmclab
 which mcxlabcl
you should see their full paths printed.
To see if you can run MCXLAB-CL in your environment, please type
 USE_MCXCL=1   %define this line in the base workspace, all subsequent mcxlab calls will use mcxcl
 info=mcxlab('gpuinfo')
this should print a list of CPU/GPU devices using which you can run the MC simulations.
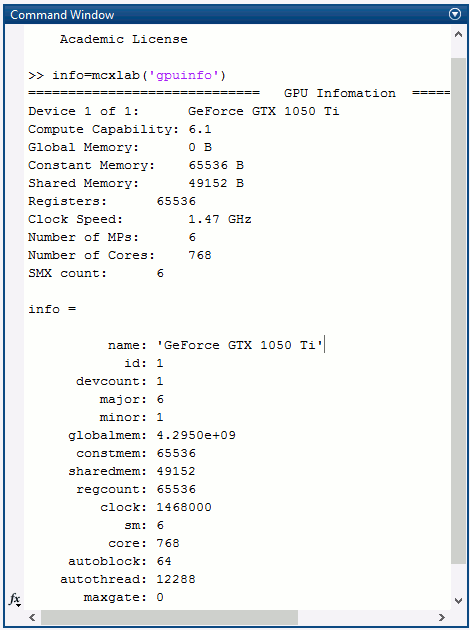
If you do not see any output, that means your CPU/GPU OpenCL driver was not installed properly, you need to go back to Steps 1-2.
If you have an NVIDIA GPU, and have installed the proper GPU driver, you may run
info=mcxlab('gpuinfo') % notice the command is mcxlab instead of mcxlabcl
this should print a list of NVIDIA GPU from the MATLAB window.
9. Final suggestions
If you are able to complete this step successfully, you may submit a survey from the below link and let us know you are ready for the workshop.
https://goo.gl/forms/n2BxesZgcL1D6piF3
or continue to test Method B as a backup plan in case Method A fails.
Feel free to try more simulations by browsing our screencast tutorial page at
http://mcx.space/wiki/index.cgi?Demo/MCXStudio
When you have difficulty running our codes using your hardware, please feel free post to #MCXOSA18 hashtag on Twitter to get help.